In addition, any charts for financial instruments in this article are for education only. The examples shown here do not constitute trading advice or a solicitation to buy or sell any financial instrument. Past performance is not necessarily an indication of future performance.
If you would like to learn more, please read this Disclaimer for details.
The harami candlestick pattern depicts price struggling to break out in either direction during a trend. Traders often call it this occurrence an “inside day” or “inside bar” instead. So where did the name harami come from?
The Japanese say “harami” to mean pregnant. In Urdu, it means illegitimate child. In Arabic, harami is the term used to label sinners, such as thieves. Because this candle often causes a reversal of a trend, some might say that the second candle is ‘stealing’ some of the profit from the first.
The word harami was chosen by the Japanese because of the shape of the two candles that make up this pattern.
The large bar that comes first is imagined to be the pregnant woman, with the small candle representing the baby in her womb.
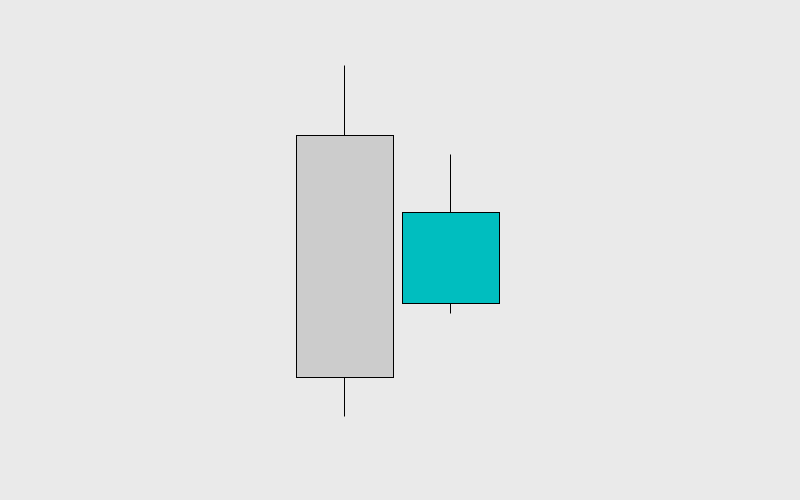
It may help to think of this candlestick pattern as the opposite of the engulfing pattern. Revisit the bullish engulfing and bearish engulfing if you need to. The main difference is that the smaller candle is the signal in the case of an inside day, while in the engulfing pattern, the large body candle creates the signal.
In this article, we will often refer to it as harami, but “inside bar” is the more common term.
We’ve combined the bearish and bullish inside bar candle patterns here, and will include examples of each. Let’s get started!
How to Identify a Harami or Inside Bar Candlestick
Every harami or inside bar candlestick pattern requires two candles. To identify them, you must compare the bodies. Though this process is fairly simple, some candles may require you to compare the open and close prices individually. In most cases, the shape will be obvious once you know what to look for.
We will explain this process for both bearish and bullish inside bars.
1) Compare the body of the two candles.
As with the engulfing pattern, you must compare the two bodies to determine if it makes up a valid harami or inside bar.
There should be a clear candle body followed by a smaller candle of the opposite color. If the first candle closes, bullish, the second must close bearish, and vice-versa. Ideally, the second candle will also be much smaller than the first, but this is not a primary requirement. There are valid inside bars where the second candle is only slightly smaller than the first. These can work, but some traders consider them to be weaker.
2) Compare the open and close prices of the two candles.
This step has two parts, depending on whether the inside bar is bullish or bearish.
Bullish Inside Bar:
- The bullish candle’s open must be greater than the close of the bearish candle.
- The bullish candle’s close must be less than the open of the bearish candle.
Bearish Inside Bar:
- The bearish candle’s open must be less than the close of the bullish candle.
- The bearish candle’s close must be greater than the open of the bullish candle.
Just as with an engulfing pattern, the inside bar requires a price gap. When the first candle closes, the price gaps up when the pattern is bullish, and down if it is bearish. Without the price gap, the second candle cannot form with a body fully enclosed by the first candle’s body.
How to Improve the Reliability of a Bullish or Bearish Inside Bar
There are two things to add on to the definition of the inside bar.
A Less Strict Definition
First, it’s worth mentioning that there is no consensus when it comes to the price gap requirement. For my harami identification, I always exclude a candlestick pair if there isn’t a price gap. But according to other traders, such as Thomas Bulkowski, author of “Encyclopedia of Candlestick Charts“, this gap is not required.
In his book, Bulkowski says the “tops of the bodies can be the same, or the bottoms of the bodies can share the same price, but not both.”
In other words, if the second candle can fit within the body of the first, but it happens to have the same open price as the previous close price, it is still a valid harami. See the example below for a pair that qualifies under Bulkowski’s definition.
This chart of Nasdaq-100 Futures (NQ) shows an application of the looser definition of the inside bar. This pair of candles fits Bulkowski’s definition.
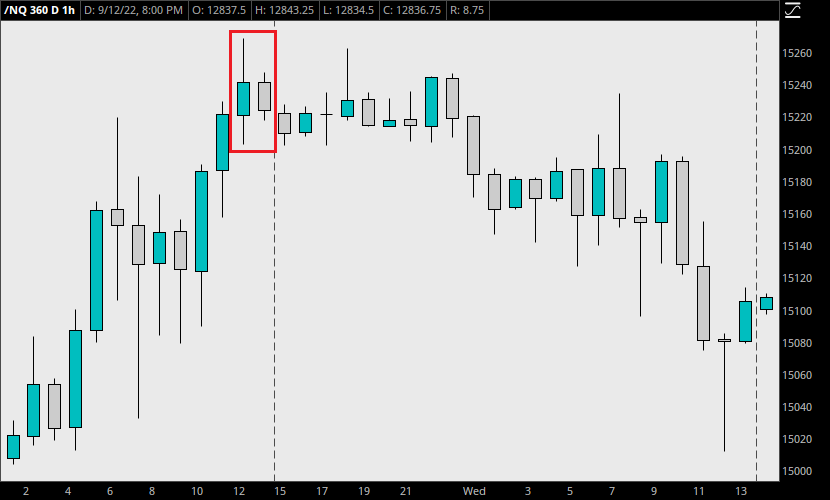
Depending on the trader, this may create a less reliable signal. These candles, without a price gap, can occur quite frequently, increasing the number of potential trades but also lowering the quality of these trades.
Considering the wicks
On the other hand, traders can limit their trading frequency by applying a more restrictive definition to the inside bar.
Sometimes, a bullish harami will appear with a long lower wick, but its body is still contained within the bearish candle before it. This is still a valid inside bar, but some traders are less inclined to use these candles. On the other hand, a bearish harami might appear with a long upper wick, signaling both an inside bar and a gravestone doji. Traders may consider that harami a better sign that the momentum has shifted to the sellers.
Depending on the strategy, a trader might decide to only consider an inside bar when the entire range, wicks included, falls within the body of the previous candle. An example of each is included below.
The Psychology Behind the Inside Bar Candlestick Pattern
Under my definition, a price gap must exist, similar to the engulfing candlestick pattern. Price gaps up during a bullish harami, and it gaps down during a bearish harami. When the buyers and sellers struggle to close the price outside the range of the previous candles, this indicates a potential shift in control.
Bearish Harami Psychology
During an uptrend, the market tends to make higher highs and close bullish more often than not. If a larger bullish candle appears, and is immediately followed by a gap down and a bearish close, it shows two things.
First, sentiment has changed enough to cause a gap down between the candles. In bullish situations, buyers would immediately pick up more shares of a stock if the price had gapped down to a more favorable level. But in the case of the bearish harami, sellers manage to prevent the price from rising back to the previous candle’s highs.
Second, sellers successfully force a closing price lower than the open after a gap down. This suggests that even at lower prices, buyers are unable to hold the line. Immediately after such a bullish run, the market is showing signs that buyers have bailed on their positions, and no longer have the same confidence at these levels.
Bullish Harami Psychology
With the bullish harami, the opposite applies, but the concept is the same. Buyers force a gap up, and maintain the price at the new levels. Sellers show that they cannot keep driving price down anymore, allowing the candle to close bullish.
Despite the gap up to higher prices, demand is still high enough to overcome any selling, continuing to drive price up. Given the right context, this shift can start a bullish reversal.
Don’t Forget about the Wicks
Finally, we must consider the wicks. Sometimes, the second candle will have small wicks that are also contained within the range of the previous candle. When these wicks are fully enveloped by the initial candle’s body, it implies that the price really had no chance of going anywhere during the second candle’s trading period. The tug-of-war that ensued prevented any progress for the previously established trend.
During a bullish trend, the sellers held price where it was, preventing buyers from setting a new high.
During a bearish trend, the buyers kept sellers from setting a new low.
In each case, the market struggles to show signs of the trend continuing, and then closes in the opposite direction. Traders use this as a sign of a potential reversal developing.
How to Trade the Inside Bar Candlestick Pattern
With the inside bar, there are mostly two main ways to trade it. Traders enter either after the inside bar candle closes, or after confirmation from subsequent candles. Stops can be tricky, as you will see in the example below.
Example Trade
From March 14 to March 29, 2022, Apple (AAPL) prices rise from $150 to $178 per share. Buyers show complete control, as every candle closes bullish for 11 trading days in a row.
See the chart below. Notice what happens after the 11th day closes bullish.
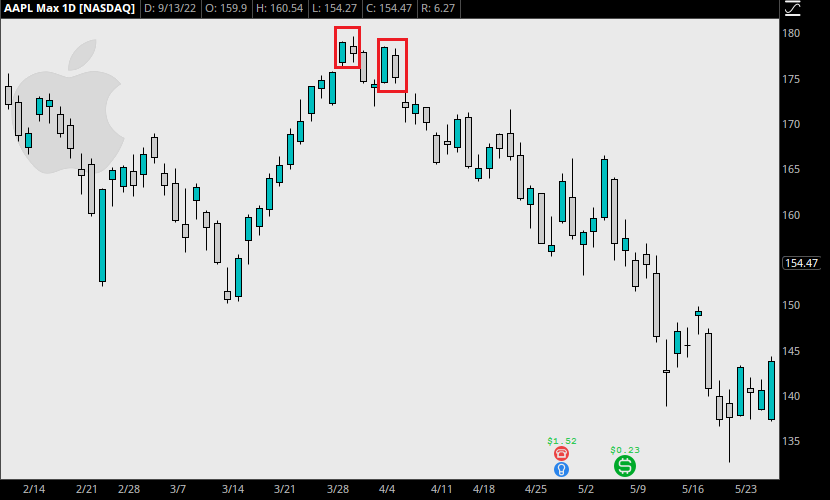
Sellers cause a price gap downward, and on the 12th day, AAPL closes bearish. The market makes a new high momentarily, but ultimately closes with a bearish harami.
From this point, on March 30, 2022, a trader could consider closing his long position or opening a short.
Let’s say our trader notices the bearish harami, and exits his long position wisely at $177.84 on the following open, on March 31, 2022.
While it is viable to go short here, some traders wait for extra confirmation. This 12th day closes bearish, but the following day closes with a bullish hammer. The market is signaling that buyers remain interested enough to force prices back up from the level near $172.00.
A few days later, on April 5th, the second inside bar candle pattern appears. This time, our trader is fully convinced that the market has exhausted its upward momentum.
First, the market failed to make a new high. Then, it immediately sold off and gapped down on the first sign of a bullish recovery 2 days prior. Our trader decides to open a short position, with 10 shares at $175.06, the closing price on April 5th.
With a total position size of $1750.60, a stop is placed above the highs at $180.00. This trade features a maximum risk of $44.
As the market begins selling off, our trader has unrealized profits of over $400 by mid-May. At a price of $137.59, AAPL closes with a bearish hammer, and our trader exits on this signal.
Final Numbers
At the close of $137.59, the return is $374.70 on the initial investment of $1750.60, a 21.4% gain in 2 months.
With the stop placed at $180, the risk-to-reward ratio is 1:8.5.
Conclusion
When trading the bullish or bearish inside bars, it’s easy to get caught up in taking excessive trades. This is because this signal can be more common than other candlestick patterns, especially in the stock market. With such a large time period between markets closing and opening, buyers and sellers have more control over price gaps, leading to potential false signals. Therefore, it’s important to consider the market situation leading into the inside bar before making any decisions.
Leave a Reply